Return to Help Index
Troubleshooting espresso machines. Help - Diagnostic - fitting instructions.
Anti Vacuum valves purpose faults and fitting.
  Anti-Vacuum Valves.

The sole purpose of the anti-vacuum valve is to allow air into the boiler when cooling, and allow air out when heating, these valves spend most of their life in the closed position so can and do stick closed even when the coffee machine is cooling. If there is a persistent hiss from the machine the chances are it’s the anti vacuum valve leaking please read on. It is good practice to open the steam valve not only when the machine is cooling to avoid a vacuum but also leaving the steam valve open when the machine is switched on and heating only closing when steam starts to be expelled is also good practice. There are good reasons for this, please see bad tasting coffee. Removing the anti-vacuum valve for replacement is not a difficult job but the correct size spanner will be needed, a sharp tap on the side of the spanner will shock the joint and it should release easily, if the valve is in the top of the boiler a slow pull can kink the boiler. Most anti-vacuum valves are not expensive and to avoid problems should be changed on the annual service, new seals are available however the body can and does corrode making it impossible to get a good seal so a new valve saves problems. When fitting a new valve use a thread sealer and the correct copper washer. For part numbers Anti Vacuum valves 0403 - 1509 – 1937 – 3124 – 3433 – 5119 – 7230 – 8692 – 8693 – 15379 – 18819 – 29242 – 29062 – 26992 - 24753
Back flush solenoid.
  Back Flushing.

The purpose of the back flush solenoid is twofold, to clean the machine and to remove the pressure from the group handle after extracting the shot. If the back flush solenoid was not there when you removed the group handle immediately after pulling a shot it would spray hot water and coffee grinds over you. When you press the button to pull the shot the solenoid nucleus shoots up allowing the hot water into to group handle, at the same time the nucleus top pad seal closes the exhaust port. When the nucleus returns to its closed position it opens the exhaust port allowing the pressure to disperse via the bypass slot in the nucleus. This action allows coffee water and perhaps a few grinds to enter the valve. Coffee has a high fat content which produces the nice golden crèma on the shot; this fat builds up in all parts of the machine where the coffee water passes including the bypass solenoid which will eventually affect its operation. The back flush system does also allow the cleaning of the group head to remove stale and burnt grinds especially the small galleys in the group head where bad tastes can come from if not cleaned. Don’t forget to run hot water through the group head and handle before making the first coffee to bring the temperature back to its stable operating temperature if service is to continue. Commercial coffee machines should be back flushed at least once a day using a cleaning powder or solution to remove the fats, should the machine be in a restaurant where it is used at meal times and left unused until the next service it should be back flushed after each service, If left to stand bakes the fats and makes them more difficult to remove. It’s a good idea to quickly back flush with water before making an espresso; the espresso is the purest form of coffee and will be tainted by stale grinds left in the group head, so a quick back flush will maintain the quality of the shot. Don’t forget the group handles, soak these in cleaning solution then flush thoroughly and polish the outside. There are no rules when it comes to domestic machines and some people back flush once a month. The same as with commercial machines the longer the fats are there the harder they are to remove. Whatever your regime is its good practice to back flush with water several times a day in a commercial environment and after use for domestic machines before switching off. If you have a machine with a manual back flush system it has been said the cleaning powder will remove the lubrication and cause wear of the moving parts, however, water should not get to the spindle and lubrication, if it does the seals probably require replacing. Final thought. You can’t break a coffee machine by cleaning but you can by not cleaning.
Boiler Contamination.
  Boiler contamination.

Boiler contamination or fouling by milk being drawn into the boiler. How There are 3 ways a boiler can become contaminated and by far the most common is soaking the steam wand over night to clean off burnt on milk deposits.
All machines have an anti-vacuum valve which closes when the machine is heating to allow trapped air to escape from the boiler until steam is produced and then opens when cooling to avoid a vacuum in the boiler. These valves do stick in the closed position.
  • 1. Air needs to enter the boiler so it is sucked through the steam wand taking in dirty milky water. Over a period of time this builds and sours the boiler making the steam smell foul and the coffee taste dreadful.
  • 2. Steaming milk when the boiler is not up to pressure or is cooling down after being switched off is another way it can happen. As soon as the pressure drops below a certain level it will immediately suck milk back into the boiler from the foaming jug. This usually results in the boiler water turning milky and then over a short time it will start to smell and taint the milk-based drinks and tea if water is drawn from the boiler.
Avoidance 1. Never soak the steam wand. The easiest way to avoid this is to keep a clean damp cloth next to the machine and wipe the stream wand after use, it only takes a second.
  • 2. Never use the steam wand when the machine is heating or cooling.
  • 3. Always expel a little steam before foaming the milk, this will check that the boiler pressure is correct and blow out any water in the team wand.
  • 4. Always heat the machine with the steam wand valve open until steam starts to be expelled and then close the valve, wait until the steam pressure gauge is indicating the correct pressure 1 to 1.5 bar or sufficient time has elapsed to complete heating process.
  • 5 Never soak the steam wand and never steam milk when the machine has been switched off or is not up to pressure.

There is yet a third and rare way boilers become fouled. Most outlets use the coffee machine as a hot water supply for tea etc. Very busy outlets will use a separate water boiler. This is perfectly fine as it means the coffee machine is not put under undue pressure to produce gallons of hot water as well as the steam. But! The coffee water is fresh from the mains heated via a heat exchange in the boiler, the hot water supply is from the boiler and if you never take water from the boiler it will become foul over a period of time and make the steam foul. The little water replaced for steam is not enough to stop this happening. It must be remembered that what goes into the boiler and what is in the boiler will stay there, especially when only drawing off steam.
Boiler not heating diagnosis.
 
This write up refers too Boiler elements, Pressure stats/Pressure switches and
over temperature trips.
It goes without saying make sure the machine is isolated from both the mains electricity and
water supply before dismantling.
There are possibly 3 or 4 reasons the boiler will not heat, the first one is the power supply
switch failed although if the rest of the machine is working E.G. the pump when calling for
coffee then the switch is fine.
The pressure switch can fail, these fail normal due to the contacts burning away after years
of service or the diaphragm perishing, the latter will cause overheating, to check the
pressure switch you will need to measure the voltage using a multi meter on the output
side.
The pressure switch can also fail if the element blows although this is not common these
days with sensitive supply trips.
The next possible cause is the element itself, the only way to test the element is again with a
multi meter, this time on the ohm’s reading scale to check for continuity in each element,
you should have a reading of, well it depends on the actual wattage of the element, what
you don’t want is zero or open circuit.
If it is open circuit it will need replacing, this is not a job for inside a café or kitchen unless
the machine can be placed over a sink draining board as once the element is removed it will
flood.
If the mains supply tripped then you can check the element for earth leakage by taking a
reading from each of the elements to the boiler earth, each element will need to be
disconnected completely to avoid and back feed readings, there should be no readings as an
open circuit, if you do see a reading no matter how high the resistance the element must be
changed.
When fitting a new element make sure the surface is clean, a thin covering of a high
temperature gasket sealer can be used for cardboard gaskets although we recommend
using Teflon gaskets as these will not stick and should it need replacing again it the future
will save time.
If a Teflon gasket is used do not over tighten the nuts or bolts holding the element, once the
machine has heated it is recommended to tighten them a ¼ of a turn.
The last cause can be is the over temperature trip tripping or failing, (this only applies to
machines where one is fitted) if just failed then it needs replacing, if it’s tripped then the
pressure switch should be replaced as the contacts can weld together causing the machine
to overheat, however this is a symptom of the element drawing a high current, possibly due
to an earth leakage which is not great enough to trip the power but enough to over time
weld the contacts in the pressure stat. Please see below.
The temperature trip tripping can lead to the replacement of the element and the pressure
switch, to replace both would be a good precaution especially if the machine is urgently
required for service.
What causes earth leakage?
Limescale build up on the element isolates the copper of the element from contact with the
water, this causes hot spots which over time will fail and can cause the element to leak
current into the water, this may not be a big enough leak to cause any trips to blow but is
enough to overheat the contacts of the pressure switch and even the over temperature trip
over a period of time.
Over Temperature trips.
A good quality machine will have an over temperature trip as a second level safeguard;
however, these can become over sensitive with age.
If the machine is knocked and it trips the trip should be replaced.
Pressure stat/pressure switch
It would sensible to replace the pressure stat at the same time as replacing the element, this
would avoid delays if the pressure stat proves to be faulty after the element has been
replaced. The pressure stat and element work together and possibly have the most
demanding job in a coffee machine so I suggest replacing them both at the same time to
avoid down time in the future.
I have placed this advice separately as the decision is for the person repairing the machine
and the person who is paying.
Changing group seals
 

Changing Group seals


1 2 3

This can be a bit of a task if it’s some time since they were changed.

It’s important that group seals are changed regularly to maintain a good seal.

1) Group heads using full shower plates

2) Group heads using flat shower plates

3) Group heads using cap shower plates

Removing the old seal.

Unfortunately there’s no tried and tested method and it can be down to just struggling. If you do replace your seal regularly there should be no real problems encountered, however if left too long they go extremely hard which makes them more difficult to remove. There is a pick available which might work on a soft seal but will just bend on old seals, a woodworking bradawl might be better as it would be stronger or I use a small strong screwdriver.

1) Using one or two small self-tapping screw screwed into the old seal, it may be possible to pull it out or lever it using a pair of pliers against the bell housing, or if the seal is solid screw straight through and jack out the seal. With shower plate type 1 it is possible using a flat bladed screwdriver pushed hard into the side of the shower plate and then using the bell housing as a lever point, this will require replacing the shower plates. We always recommend new shower plates when replacing group seals as it’s not always possible to remove all of the stale grinds trapped in the mesh.

With shower plates type 3 and some type 2 you must remove the shower plate first and drop the spray plate, then proceed as above. It’s a good idea to replace the centre screw especially if you had difficulty in removing them, this will avoid more problems the next time.

2) Again using a small screwdriver you may have to do it the hard way and dig the seal out, once a small section is removed it’s easier to remove the rest.

3) Once the old seal is out it’s important to make sure the area it’s perfectly clean to allow the new seal to seat correctly.

4) At this time it’s a good idea to remove the spray plate or divider if you haven’t already to clean. We recommend our small brush with stainless steel bristles. It’s not too aggressive. Make sure all small holes are clear and re-fit

Fitting the new seals

1. The new seal will have a small bevelled edge on one outer side and this goes up to allow for the corner machining in the group head.

2. You can smear the seal with vegetable oil to help it slide easier. Push the seal in as far as possible keeping it as even as possible (don’t forget the shower plate type 1 goes in the seal first and any shims used). (DON’T USE oil other than vegetable.

3. Now using the group handle with the filter basket removed try and use it to push the seal in further. If it still won’t seat you may be able to engage one side to the filter handle and turn it, not too far, and the same with the other until you can engage the full handle to seat the new seal. Now fit the filter basket and again using the handle to push the seal into its full seated position. Check to make sure the seal is flat and even. Test by back flushing.

There is a special group handle available in our tools section to fit group seals if required.

Replacing a Bezzera seal

1. Bezzera bell housing can easily be removed by undoing the three Allen bolts on the top, this makes removing and cleaning the assembly much easier; however, you will need to replace the top seal as well.

Make sure the machine is isolated from the electricity supply as you will be working next to the group switches.

2. Bezzera like may group heads use an 8mm seal, however with Bezzera always use the correct one with the 3 nicks which stops the seal hydraulicing, this is caused by the group pressure forcing a small amount of water up the inside of the seal, this will push the seal down over a period of time until the group handle will no longer engage correctly and can blow the handle out of the bell housing.

The 3 nicks provide an escape route for the water. This type of seal can be used on any 8mm group head of the same dimensions and will avoid it happening on any machine.

Fit the new seal as above as far as you can and then refit the bell housing to the machine. Now complete the fitting as 3 above.

3. There should be a small roll pin in the front underneath indicating the front. Get it wrong when refitting and the handle will point in any direction but the right one. If there is no roll pin and you didn’t mark the front then place the handle in the bell housing to give you the correct position.

Replacing Cimbali Group

1. Use a shaped seal so the angle faces down and will sit onto the group handle. The handle position is controlled by 3 small tapered bolts in the bell housing. You can remove these bolts and drop the whole assembly to easily remove the old group seal. Once cleaned fit the seal with the angle on the seal facing downwards.

Using vegetable oil on the outside of the seal you now have to replace the handle holder.

Once you have the bell housing pushed up sufficient to replace the screws, fit them but don’t tighten them.

2 Place a group handle in handle pointing forward and the evenly tighten them a small amount at a time releasing the pressure on the handle and then making your adjustment until you have the handle pointing forward when you place the handle in under working conditions. (In too tighten and out to loosen).

3. Should you find you have a leak at one side when making a shot you can slightly increase the handle seal pressure by adjusting the screw at the point of the leak. Don’t forget small adjustments at a time.

Parts we recommend replacing are the shower plates and the screws along with the group seals and shims.

Coffee machine flooding.
 

Coffee machine overfilling and flooding.

If the coffee machine floods overnight when switched off the boiler fill solenoid will need replacing.

Isolate the machine from the mains electricity and water supply before attempting any work.

Replacing the solenoid is not a difficult job but you will need a few spanners and some thread sealer just as an added precaution.

Replace the old solenoid with the new one making sure you check the direction of flow.

If you forget then the higher-pressure side goes to the side of the nucleus where it can’t force the solenoid open, in the case of a boiler fill solenoid it’s the mains water in which is the higher pressure. The side with the small hole is the out to the boiler.

Over filling only when the machine is switched on can have a few causes.

1) Make absolutely sure the machine has a good earth/ground and the boiler has a good earth/ground, the control unit uses the earth or ground as a reference point.

2) Remove the depth probe from the boiler, remove the whole assembly as only pulling out the probe can damage the Teflon seal. You can’t damage the probe other than bending it so scrape off any scale, as the scale builds so does the water level. Check all cables and connections to the control unit.

To remove the assembly a sharp tap on the side of the spanner to shock the joint is better than a slow pull as this can kink the boiler.

3) If none of the above correct the problem then it’s the actual control unit at fault.

When ordering a new unit always check the makers codes/part number the code should be printed on the label, all electronic units cannot be returned for credit or replacement, this is because faults on the machine can cause the control unit to fail.

Goes with Boiler fill solenoids

0155 – 0154 – 0484 – 0776 – 1337 – 1356 – 1381 – 1465 - 1890 – 2103 – 2107 – 2365 – 2616 – 3421 – 4035 – 5038 – 8110 – 19363 – 8682 – 9975 – 17623

Electronic control unit faults.
 

Electronic control units

Electronic control units generally work or don’t work but there are several types which can have different problems.

It's so important to make sure the diagnostic is correct as these units cannot be returned for credit as a fault on the machine can cause the electronic control; unit to fail.

There is the button pad type which is where the electronic dosing and boiler fill is controlled from the button pad, the second is where the control unit is a separate box only controlling the boiler fill and the third type is where the boiler fill and the dosing is controlled from a separate box.

I’m sure there are others as now we have PID control units, LCD displays as well.

Faults.

For control unit’s that only control the boiler fill (manual machines) or your problem is with boiler filling please see Coffee machine overfilling and flooding.

If the measurement of the coffee is inconsistent then the problem lies with the flow meter the device the tells the control unit how much water has passed through to the group head, this is not a definitive diagnosis as I suspect the control unit can forget how to count but this would be rare.

Most flow meters have a small LED light you will see flashing, if it’s not flashing when calling for coffee then it’s not working, however if it is flashing and you have inconsistent shots it is the Flow meter not providing the control unit with the correct count.

Some flow meters don’t have an led so in this case it’s a leap of faith and the only way to prove the fault is to replace the suspected flow meter.

If one side or one group head stops working where there is one control unit the key/button pads can be exchanged for each other to eliminate a faulty key/button pad, if the fault then swaps over to the other side then the key/button pad is at fault, if not then a new control unit is required.

Where the control unit is built into the key pad it is still possible to change them over however there may be small jumper plugs or dill switches on the rear to program the control units’ function which will need settingb to the correct position..

If the fault is no coffee flow or the boiler fill pump is not working then some investigation is needed to determine if a solenoid or pump motor has failed before replacing the control unit as these can damage a new control unit if there is any form of short circuit.


Poor tasting coffee and how to avoid it.
 

There are many reasons coffee can taste bad, below are a few mechanical reasons and please also see our 5 reasons for poor tasting coffee.


Co
ffee tastes strange or burnt.

The obvious answer to coffee tasting strange is a fouled boiler, however there are other equipment causes.

The grinder is one of the most common causes of burnt tasting coffee.

A clue is fine grinds in the cup after drinking. This is a strong indication that the grinder blades have seen better days. When they become blunt they rub rather than grind the coffee which produces the fine powder you see in the cup, it also produces heat and it can re-roast the coffee giving it a burnt and bitter flavor.

Solution, replace the grinder blades.

A dirty grinder can give the coffee a bad taste. The fat in the coffee deposits in the hopper will turn rancid so the hopper should be cleaned regularly and the grinder itself should be cleaned at least monthly.to avoid this problem. You can use a cleaning powder to avoid the need to strip the grinder and loosing your settings.

The water filter or water treatment unit is another cause of funny tasting coffee.

The water treatment unit should be replaced every 12 months to 24 months. Bacteria can build up in the filter head and cause a fishy/prawn smell.

Disconnect the filter from the machine and run a glass of water off and smell and taste to check the quality.

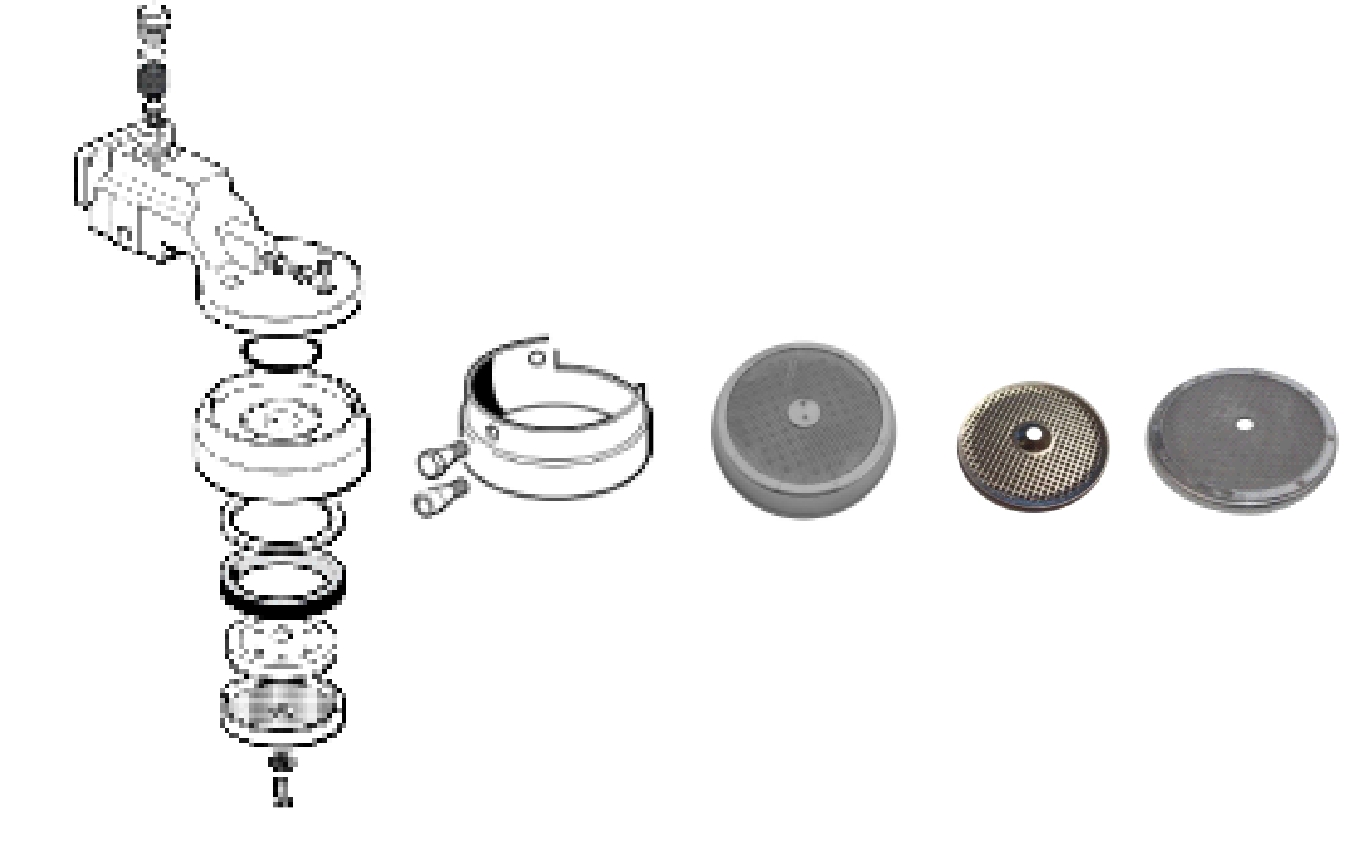
A dirty machine. Coffee has a quantity of fat which is what produces the crema. This fat also sticks to the inside of the group head, solenoid and the group handle (Portafilter), this fat can become burnt and taints the brewed coffee.

It is one of the most important rules of the food and beverage industry. CLEANLINESS, and this also applies to the coffee machine. It should be back flushed using de-tanner powder made for espresso machines daily if not more often.

If you are a bar or restaurant where your trade is at meal times then it’s important to clean your coffee machine after a busy period. Leaving the fats to bake on only makes it more difficult to remove. Little and often is recommended. Don’t forget the coffee is the last product to be tasted in a cafe or restaurant and it could be the last impression the customer leaves with.

When back flushing with the powder make sure it’s well flushed with fresh water. The cleaner starts as a powder and will revert to a powder in the group head if not removed, this can make the coffee taste and also stop the back flush solenoid operating.

Scale build up in the heat exchange system and the group head can also be source of tainted coffee.

Over extracted coffee will give a burnt taste. I have seen Americano’s made by filling the cup through the coffee instead of dropping the shot onto a cup of hot water, this will bring to the forefront elements of the coffee you don’t want as well as burning the coffee.

THE MOST COMMON REASONS FOR POOR COFFEE TASTE

Poor coffee taste.

The whole point of using a quality professional coffee machine is to be able to provide a quality coffee experience. Therefore, it makes sense to be aware of common problems in order to avoid them. There are many variables involved with espresso coffee but, the most common problems can for poor tasting coffee can be categorized into one of five common problems:

Coffee is the largest trading commodity second only to oil. Trading at the moment has driven coffee prices to a 30 year high at well over $3 a pound for the raw bean. This high is also due to Brazil, the largest coffee producer, now starting to consume almost as much as it produces making it a consumer approaching the consumption of the USA. With this in mind, it still remains one of the largest profitable products and as such the margins enjoyed by companies supplying coffee should demand that little bit of effort it takes to supply an excellent drink.

1. Dirty machine

The last estimate of ESPRESSO machines suggested that an estimated 95% of all the machines are filthy! It is rare to find any traders who fully understand that baskets and even the portafilters need cleaning, back flushing can happen at any time and the spray and shower plates/screens should be removed and cleaned as often as possible. A machine can’t be too clean. It's not nice to be given poor quality coffee with the taste of dirt, it's easily recognized as it invariably leaves a harsh, bitter and burnt taste in the mouth for some time after initial tasting.

Environmental health dictates the standards of cleanliness for commercial establishments, however for some reason coffee machines seem to be overlooked,Often, an establishment will keep everything else spotless yet neglect the ESPRESSO coffee machine, whilst wondering why regular coffee drinkers stop visiting. You can’t break an espresso coffee machine by cleaning, but you can by NOT cleaning. Use a good cleaning powder to remove the coffee fats that build up, and give your customers a good coffee experience not just a cup of coffee.

2. Grind too course or the grinder is ignored:

The grinder is set by the supplier and staff are normally told not to inter fear with the settings, this is not acceptable. Like all moving parts, the grinder needs to be routinely unlocked and cleaned to prevent the collar seizing up, more importantly to remove the fats, which if left will turn rancid. It should also be set and regularly adjusted to maintain the quality of coffee, coffee absorbs moister from the air which changes the grind therefore continual monitoring of the grind is required to maintain the quality of the extraction. So without regular attention the grind will change generally coarser, creating a fast pour which will lead to poor customer satisfaction. A little regular attention to the grinder and all should be OK.We would recommend at least one member of staff be trained to monitor the extraction and know how to correct and maintain a good extraction. 3. Stale coffee:

It should be obvious, but it isn’t, so please allow me to emphasis that instant coffee, in a jar, lasts a long time because it has an air tight lid. Fresh ground coffee doesn’t and it will taste stale very, very fast. Staff rarely receive the full information on the life span of whole coffee beans or coffee ground for Espresso based drinks, and that’s how mistakes are made. Yesterday’s grinds are very unpleasant to taste and the success of any ground coffee is exclusively dependent on its freshness. It may be more convenient to grind in bulk, but taste must be the priority to encourage a loyal and regular client base.

Coffee beans exposed to air can have a life span of as little as 2 hours, ground coffee exposed to the air has a life span of around 20 minutes and, once in the hot portafilter, it’s approximately 45 seconds. These times are only approximate, as temperature will have an effect, and a good tight fitting lid on the bean hopper and doser will extend the life but not indefinitely. That lovely aroma from fresh coffee is called de-gassing, it is in fact the coffee going stale. If the aroma is weak or has completely disappeared then the coffee is stale and should be discarded.

Grind only sufficient coffee for immediate needs. A full hopper is fine for the start of a busy lunch period, but not thereafter. Any remaining coffee beans or ground coffee can be stored overnight in sealed containers, to be added to fresh coffee the next morning to avoid waste. However, if the coffee has been sitting for hours losing its flavour, it’s better to waste it than lose customers.

Some establishments use a bean to cup machine with two hoppers; one for normal beans and one for decaffeinated, with both full to the top. Given that most coffee shops sell very little decaffeinated drinks, consideration needs to be given as to the length of time the coffee beans have sat above a hot machine. That’s not the best place to store coffee!

Coffee beans should be stored in a air tight container in a cool dark place, but not in a refrigerator, yes they are cool and dark but too cool and will solidify the coffee fat. When you need to grind more coffee beans they will not give a correct extraction, this will lead to the grinder setting being altered and of course when the beans warm the grind will once again be incorrect.

4. Poor quality coffee:

This is a cautionary note as so many traders have lived to regret investing in economy instead of quality. Time and time again inexperienced buyers seem to presume that all coffees are the same. They can be tempted to change suppliers to guarantee a small saving on the case price which relates to a couple of pence per cup, and then they wonder why customers stop coming Questions need to be asked as to why the coffee is so cheap, and how are the manufacturer/suppliers making the savings? Coffee suppliers will use any demand for cheaper coffee as an excuse to supply a poor quality product. So, novice retailers would benefit from being better educated before negotiating price. The difference in price of good quality, when compared to a poor quality product, relates pence per cup. The quality market is finding it easier to expand in a market that’s already saturated with poor product because coffee drinkers will always travel that little bit further to an establishment that they know will supply a good espresso based coffee. That’s a fact so, in real terms, it’s not cost effective long term to save just a few pence in the short term.

5. Quality control:

It should be obvious to most people but, surprisingly, most servers don’t taste their own coffee then wonder why lots of customers don’t drink it and don't come back. Often in the same building, the chefs will taste the food and the bar staff will sample their own cocktails, but no-one is sampling the coffee. Yet, there is no better quality control. Tasting the coffee will offer information to diagnose any of the most common problems and it is a risk to rely exclusively upon the feedback of customers. If they hate the coffee, customers won’t necessarily complain but won’t return. That’s the way it is.

6. Consider

The above reasons for poor tasting coffee can be summarized by 2 headings:

a) Training:

With correct training, and attention to how to adjust the grinder, there’s no reason why excellent espresso based coffees shouldn’t be supplied every time except, of course, for poor quality coffee.

b) Apathy:

Some staff have a poor attitude and just don’t care about the coffee quality. Very surprisingly, it’s not just the non coffee drinking staff members who demonstrate this attitude. The normal excuse is that they are too busy to mess around, but is a chef too busy to provide good food? All products should be to the highest standard possible. Constant quality control will result in being busier, so it’s in the owner’s interest to monitor the product and make sure everyone is fully trained and enthusiastic about giving customers a great coffee experience.

7. Consider:

High street cafes need a regular customer base more than once in a while, or at holiday periods once a year. Unlike motorway cafes and airports, they need a regular clientele for survival and high quality coffee will guarantee returning customers.

8. I am adding this last thought as it is becoming more apparent that cafe owners ignore the basics when choosing a coffee, owners tend to choose what they like and not the customers, a strong coffee or a coffee with a high Robusta content is not to everyone liking, a good quality all day coffee appealing to 95% of public taste is better than a coffee appealing to 5%. Ideally a range of coffee would be the answer but this requires more grinders, (smaller specialty grinders are the answer) more work space and a greater understanding of cross contamination of the various blends, we take our hats of to cafes offering choices.

Replacing the rotary pump.
 

All Rotary water pumps.

Symptoms of rotary water pump failing. Are excessive noise, low water pressure and the pressure gauge pointer bouncing and vibrating. These are the general symptoms however the rotary water pump can start to seize without vibration or excessive noise but the pressure and flow will overtime reduce.
Causes of failure are old age, low mains water pressure, not using the rotary water pump for a few months will cause it to seize, and failing seals allowing water to enter the bearings.
To replace the rotary water pump, it is not normally required to remove the whole pump and motor assembly especially the clamp band fitting type however some bolt on pump heads may be difficult to access the bolts with the motor in position.
Another type is 2 hook type which as described has 2 hooks as part of the flange, these you only need to undo the bolts enough to turn the pump head to remove. Removal and refitting Always isolate the machine from both the mains electricity and the mains water supply before disassembling the machine.
First remove the braided pipes attached to the rotary pump head, it’s easier while the head is held solid on the motor. Now undo the clamp ring holding the rotary pump head to the pump motor, a sharp tap may be required the separate them.
There are 2 pipe fitting’s screwed into the rotary pump head normally one is a 90-degree bend and one is straight, make a note of which side each one fits along with the position of the 90-degree fitting, now remove the straight one first as the bent fitting will not turn 360 degrees with the straight one installed. Refitting is the reverse however it is recommended that a small amount of thread sealer is used on the fitting threads as a precaution.
Don’t forget to fit the 90-degree fitting first making sure it is pointing in the right direction. Once the rotary pump is installed along with all pipes tight turn on the water supply and check for leaks all should be good. Turn on the power supply and press the star button which will run the pump and check the water pressure gauge, it should read 9 Bar, if it requires adjusting there is an adjusting screw on the side with a locking nut, release the locking nut and screw in slowly to increase the pressure or out to reduce the pressure, once you are happy that it’s 9 Bar on the gauge tighten the locking nut holding the adjusting screw in position with a screwdriver.

Setting up your espresso coffee machine for the first time.